Showing posts with label diy food. Show all posts

June 5, 2009

Dinky Diy`s Guide to Controversial Pav - Aussies vs. Kiwis


OR, In which Australia turns a twinkle toes into a cake.

Being the outstanding ambassador I am for our proud nation, I was racking my brain to think of cultural oddities and historical anecdotes that may capture the imaginations of the rather unimpressed Russians. Something that might link our two proud nationalities together as brethren, other than a mutual dislike of Hitler.

..And it was then that I remembered Anna.

Internationally celebrated Russian prima ballerina, Anna Matveyevna Pavlova (1881-1931), toured both Australia in 1926 and again in 1929, which is kind of odd because in these pre-multimedia times, Down Under was a bit of an outpost for all things cosmopolitan and culturally sophisticated back then.

Oh, we knew about the latest trends... just two years after they were hip. A bit like Kazakhstan now.

So, we can only speculate that bookings were coming a bit far and few between for ol`Anna if she was making the long haul to dance for the Perth elite.

As you can imagine, this tour made pretty big news in Oz. She also happened to stop by New Zealand during this tour and it is here that the squabble begins.

"A symphony of silence! So Pavlova has been described," began the report in the West Australian on Tuesday, July 9, 1929. "But who, seeing the famous ballerina for the first time as she stood on the deck... at Fremantle yesterday, could apply the description? It was Babel itself!" The reporter managed to share her cab into Perth... "They are funny, these Australians," she pronounced in the cab.

The sensation Anna whipped up when she soared on air across these Southern stages inspired the light, frothy meringue desert, Pavlova (pav-LOH-vuh), that both countries controversially claim as their national dish.

The chef of a hotel in Wellington, NZ was reportedly so taken by Pavola`s costume, draped in green silk cabbage roses, that he went into a creative frenzy with fruit (legend has it he was a bit of a Kiwi-fruit himself, but that`s another story.) He crafted the shape with a meringue case, the netting of her tutu was suggested by whipped cream and he turned to sliced kiwifruit, then known as Chinese gooseberries, for the roses.

In 1934 at The Esplanade Hotel in Perth, the licensee Mrs. Elizabeth Paxton was doing a roaring trade with her popular afternoon teas. She had asked her chef, Bert Sachse, to devise a special desert for these highly sought after occasions, that might titillate the gossipy tea drinkers. After a month of experimentation, Sachse presented the now familiar pavlova recipe which, according to local legend, was so named by the hotel manager after remarking, "It is as light as Pavlova".

Bert Sachse said in a magazine interview in 1973 that he was trying to improve the Meringue Cake, a prize-winning recipe from the "Women's Mirror" edition of April 2, 1935. The recipe was contributed by "Rewa"of Rongotai, NZ... hmm.

"In the "Good Food Guide" to British Isles restaurants in 1977 referred to the pavlova as the Kiwi`s but changed the entry the next year to say it was Aussie. Hilary Fawcett, who compiled the glossary, wrote about the change: "There does seem to be some controversy as to whether the wretched thing originated in NZ or Australia and I was reduced to doing a straw-vote count."

"It is possible, if ungenerous, to deride the pavlova for culinary innocence. It was adopted from New Zealand. Yet Herbert Sachse made a genuine, crystallising contribution. The pavlova served its original purpose admirably. It then caught the popular imagination. Distilling the Australian concept of sweet living, it is the single great discovery thus far of our cooking."

The Russians looked at me blankly. Maybe Anna was right, we Australians are funny ones, honouring a ballerina with a meringue cake. But then, it has secured her place in our folkloric traditions far better than her Dying Swan managed.

Then suddenly, Mrs. Russian, through laboured translations, remembered childhood summers at her grandmother`s dacha, where she would be fed homemade bizet or meringues. She rushed (Why are you Rush`n? Bahahahahahahahahahahahahha, what`s that you say? A Dad joke? Carefacter: 0) into the kitchen and started baking.

Turns out the Russians call meringue bizet after French composer Georges, the guy who wrote the opera Carmen. I wonder what he did for the Russians that made them think light and frothy?


Mini Bloody Awesome Pav`sBite Sized Deliciousness

Ingredients

  • 2 egg whites
  • 1/2 cup (110g) caster sugar
  • 300ml thickened cream, whipped
  • fresh strawberries, kiwi fruit, bananas sliced for topping*
  • 2 passionfruit, pulped

Method

  1. Preheat oven to 150°C. Line 2 baking trays with baking paper. Place egg whites into a clean bowl. Beat with electric beaters until soft peaks form. Gradually add caster sugar, beating well between each addition. Beat until mixture is thick and glossy - this will take at least 5 minutes.
  2. Spoon heaped teaspoonfuls of the mixture onto baking trays. Flatten meringue into a disc. Bake for 20-25 minutes or until crisp. Cool completely in the oven with the door ajar.
  3. Top meringue with whipped cream and a teaspoon or two of passionfruit pulp. Decorate with fruit and serve.


*Toppings in a recipe like this beg to be experimented with. I have had mocha, rum cream with forest berries and chopped pistachios, I have seen grated chocolate sprinkled over the lot, more tropical combos of mango, pineapple along with the regular strawberry/kiwi mix. Go crazy with this one, you would be hard pressed to get it really wrong.

May 12, 2009

Dilly Dilly Gin Drunk


OR DIY Joins the Lavender Mafia (and you thought that was just a right wing myth!)

There is a very wonderful man named Robert who runs the cocktail bar at the Rose of Australia Hotel, next to the train station at Erskineville in Sydney’s inner west. This is, by the way, my favourite pub in Sydney and I cannot speak highly enough about the beer battered fries or the staff.

But Robert is extra special. He’s like a cocktail whisperer. The concoctions he brews behind the bar are frothing fantasies of fruity flavour and his wicked sense of humour can be glimpsed in the cheeky appellations he bestows upon his creations.

If you happen to be in there, do say hello from the Russian and I.

Some of the neatest tricks Robert taught us were his infusions. He flavoured spirits with exotic spices and additions. For example, the main ingredient in his Monica Lewinsky is cigar infused vodka. He actually had a vat of Absolut that he would rotate Wee Willam cigars in. Wonderful stuff!

One infusion he didn’t do but which I happily stumbled upon at the Breakfast Creek Hotel in Brisbane was Lavender infused Gin. I don’t believe they do it anymore, but I am rather partial to a bit of Mother's Ruin and I bet you are too so never fear, Dinky DIY is here!

And since I have this periwinkle wild flower on the brain at the moment, I have a whole carpet bag full of lavender blue dilly dilly tricks!

Lavender is a member of the mint family (bet you didn’t know that) and flowers or leaves can be used fresh and both buds and stems can be consumed after drying.

English Lavender is the most commonly used variety in cooking as it’s sweetest. Don’t be buying it from the flower shop and whacking it into anything unless you feel like choking down on persticides, you either have to track down some culinary quality stuff or grow it yourself which is a piece of cake.

INGREDIENTS

  • 1 1/2 teaspoons dried lavender
  • 1 (750 ml) bottle gin, (naturally I only drink Sapphire Bombay but whatever.)


DIRECTIONS

Add lavender to gin and allow to infuse for 1 day. Strain and store.


PROVENCALE COCKTAIL

INGREDIENTS

  • 2 1/2 parts lavender-infused gin
  • 2 1/2 parts Vermouth de Provence
  • 1 part Cointreau
  • Ice
  • twist of orange rind for garnish


DIRECTIONS


Combine gin, vermouth and Cointreau in a glass/shaker. Add ice and stir thoroughly. Strain into a chilled martini glass. Garnish with the twist of orange and serve.


But the fun doesn’t stop there. You can infuse lavender into almost everything to get a bit of fragrant fanciness into your cooking.

  • Try making lavender extract for sweeties like lavender cupcakes. (lots of info and recipes here)
  • Lavender sugar is a handy little something special to have about. (Put 2-4 tablespoons of dried lavender buds into each cup of sugar, allow the plant oils to meld for 2 weeks before you use it sprinkled on toast or pancakes.)
  • Lavender infused honey just means a few springs in a generic honey to add a purple pizzazz to the taste.


Recipes that love to lap up lavender:

  • Panna cotta, crème brulee and ice cream. Milkiness and laverderiness go together like a varicose vein running up a lily white thigh. Shocking, but inevitable. Do it, it’s good.
  • Lavender chocolates
  • As a herb it can be a substituted for rosemary and goes nicely with mustard (try it with au gratin potatoes)
  • It is a major ingredient in Herbes de Provence my flirty Francophiles. Make like a slutty provincial milkmaid and rub that lavender on a breast today!

And, oh baby, this is a mighty effort from Our Lady Martha Stewart (Thanksgiving Living magazine for 2007)

LAVENDER LEMONADE

Serves 12

INGREDIENTS

  • 3 cups of granulated sugar
  • 3 cups of water
  • 1/4 cup of dried lavender
  • 4 cups of fresh lemon juice (16-20 lemons)
  • Ice for serving
  • Lemon slice for garnish

DIRECTIONS

Bring sugar and water to a boil in a saucepan stirring until sugar has dissolved. Stir in Lavender. Remove from heat, and let stand for 10 minutes. Strain, discarding Lavender. Let cool. Stir in lemon juice. (Lemonade can be refrigerated in an airtight container for up to 1 week.) Serve over ice, and garnish with lemon slices and fresh lavender sprigs.

April 17, 2009

DIY Turning Lemons into Lemon, Vodka & Limes

OR WWMD
(What Would Martha Do?)


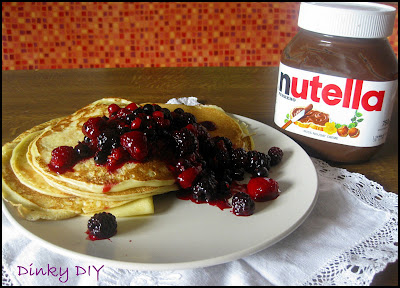
Today whilst making out with a teaspoon as it emerged from a Nutella jar and having a great big internal dialogue waaaaah which sounded like;

Me: Damn those greedy, Zegna suit wearing, Porsche Cayenne driving fianance bastards for screwing with the whole world. Mmmm, velevty chocolate sugar hitting brain and making vision blurry... And damn stupid men. If men are from Mars why don't they all bloody stay there with their power tools and lawns to be mowed and superior navigation skills and leave everyone else friggen well in peace. Mmmmm... must scrape all chocolate out of corners... delicious Nutella... etc etc.

Yeah, it was as sad as it sounds.

But then, like divine light bursting through the clouds it was at once clear what I had to do. When times get tough, just ask - what would Martha Stewart do?

Well she probably wouldn't use Delia Smith's recipe, like I did, but I know for sure she would get baking.

Ingredients For Pancake Batter:
  • 110g/4oz plain flour, sifted
  • pinch of salt
  • 2 eggs
  • 200ml/7fl oz milk mixed with 75ml/3fl oz water
  • 50g/2oz butter

Method for Pancakes:

You can follow Delia's instructions by clicking on the link above or do as I do - chuck all the stuff together and beat furiously until there are no lumps. Pour into a super hot frying pan and keep already finished pancakes in an oven set on low.


During tougher times when all that kerfuffle about rorting huge fortunes and defrauding everyone was hanging around Martha like the bad smell of a poorly kept pantry, she kept her head her and went on TV to make salad.

Whilst furiously chopping cabbage and being grilled by the anchor Jane Clayson, Martha kept on cooking, head down eyes boring into the bowl -
"I just want to focus on my salad." She huffed.


Rightly said, Martha. Sometimes life is about focussing on the salad and turning lemons into vodka-lemonades.

So I made pancakes and we were so stuffed afterwards that a happy sort of peace decended on our little house.


Here's your Wiki link for the day. Tried this at an Ethiopian retaurant in Munich a few weeks ago - very cool finger lickin' fun.

March 31, 2009

Cupcakes!


Thinking about the baked goods masterpieces at the Easter Show reminded me of my mother’s cupcakes.

Enough to make you drool, and though these ones were made for Chrismukkah last year, I tend to think they would also do well at an Easter Sunday lunch.

Very colourful, festive and isn't this picture of them just too Martha Stewart Living?

Speaking of the Divine Ms. Stewart, peace be upon Her, she just about wrote the damn book on cupcakes so get thee to the kitchen with a few of these recipes that will have everyone's mouth watering at Easter.

I am of the rather daggy opinion that cupcakes simply taste better if displayed on a stand. I know, yawn, it’s such a dull take on things I almost fell asleep just typing it. But I’ll stand by this one. And because I love you all, I have a quick DIY Cakestand for those (I imagine the vast majority?) who don’t happen to have a stand kicking about.


DIY CUPCAKE STAND


You Will Need:

  • Cake boards: 1×8″, 1×10″, 1×12″
  • Polystyrene cake dummies 2″ high: 2X5″ and 2×6″
  • Satin ribbon for the cake board and the polystyrene cake dummies
  • Wrapping paper (pick a cute, Easter-y design.)
  • Glue stick and regular craft glue
  • Sharp scissor
  • Pencil
  • Metal Pins
Step 1:
Glue the dummies together with craft glue and leave to dry completely.

Step 2:
When the dummies are dry, glue the ribbon to the dummies with craft glue. The easiest way to do this is to apply glue around the surface of the dummy. Then pin one end of the ribbon and start wrapping the ribbon firmly around so it slightly overlaps, right to the other end and pin it there as well.


Step 3:

Lay the cake boards on the wrapping paper and trace around the outline of the boards. Cut out the circle neatly with your scissors.


Step 4:

Thoroughly coat the boards with the glue stick and paste on the wrapping paper circles.


Step 5:

Secure a ribbon to the side edge of the board, dab some craft glue around the board and wrap it around to overlap the edge and re-pin in place.


Step 6:

Assemble the tiers on-top of each other. You can glue them together for extra security.


Ta da! Looks fabulous and, really, just is too easy and too cute not to do.

This tutorial was based on one from Cake Journal.com so check it out for more ideas.